The first step in configuring an installed system is to identify the network location of the media server at the teacher’s station.
![]() By Gerry Sullivan
By Gerry Sullivan
Date of Creation: 2019-11-24
Last Update: 2023-02-17
First of all, you need to launch the Live Activities Dashboard (LIVE) by clicking on the icon shown below:

Then enter Configuration.
Server Identification
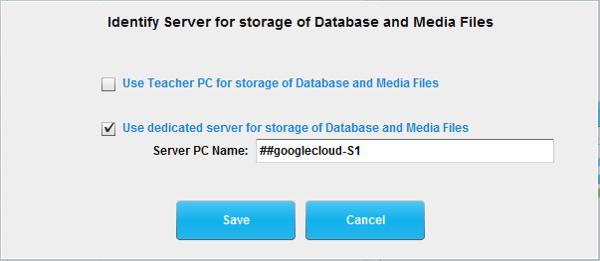
The server identification panel will automatically appear when you first launch the Live Activities Dashboard on the teacher station. This panel is shown below:

There are two choices:
- The first choice: Use Teacher for storage, is reserved for demonstration only. Always use the second choice below for actual installation in a language lab.
- The second choice is the one you will select: Use dedicated server for storage. Here you can have 2 types of databases. 1- If your database is located on a server or NAS device, enter the path to the SmartClass-Server folder. 2- If you have a SmartClass Cloud, enter the cloud name starting with ##.
Note: The format for the path information is abbreviated. Do not enter the “\\” characters in front of the server name, and do not include “SmartClass-Server” as part of the path information. File names cannot include SPACES. An example path is:
<server-name>\<hidden-high-level-folder-name$>
If you will be linking the SmartClass+ users with your school’s LDAP Directory, the path must include an \LDAP folder parent for the SmartClass-Server folder.
<server-name>\<hidden-high-level-folder-name$>\LDAP
If you are using the cloud-hosting option, the identification of the path will be provided to you. Its format (as shown in the image) is as follows:
<##googlecloud-S1>
Contact us if you would like more information.
